Building a Mountain Dulcimer - Part 2
The two plates (top and back) shouldn't be dressed until they are glued
together. The dulcimer is only a little over eight inches wide, so why use two
pieces glues together? bookmatching makes a pleasing grain pattern, for one
thing, and you'll get a higher percentage of good splits resawing four and a
half inches than you will at eight and a half.
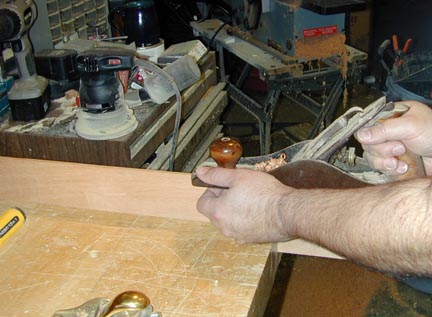 In
order to make a good joint, the edges have to be trued. I do this by clamping
the two pieces together in the vise, with the two "good" faces
together and the joint edge upward. Then I use my longest plane (a
"fore" plane, which is one class shorter than a "jointer"
plane) and take slow, careful shavings. The fingers curled under the plane's
sole help to keep it square to the boards, by feeling along the side of the
board as the stroke is taken.
In
order to make a good joint, the edges have to be trued. I do this by clamping
the two pieces together in the vise, with the two "good" faces
together and the joint edge upward. Then I use my longest plane (a
"fore" plane, which is one class shorter than a "jointer"
plane) and take slow, careful shavings. The fingers curled under the plane's
sole help to keep it square to the boards, by feeling along the side of the
board as the stroke is taken.
 The
best reason for doing both boards together and in exactly the alignment they
will have when glued is that slight errors in squareness won't matter. As in the
diagram at left, if the plane is tilted slightly, the error in one board will
compensate for the other one when they are flipped open and butted up. Even if
the plane wobbles as it goes down the boards, the error at each point will be
compensated.
The
best reason for doing both boards together and in exactly the alignment they
will have when glued is that slight errors in squareness won't matter. As in the
diagram at left, if the plane is tilted slightly, the error in one board will
compensate for the other one when they are flipped open and butted up. Even if
the plane wobbles as it goes down the boards, the error at each point will be
compensated.
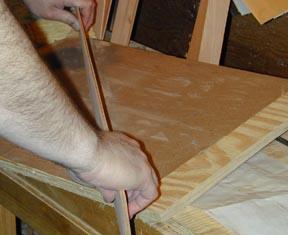 Here's an alternate way to get a tight seam: a big piece of
plywood with sandpaper glued down to it. The diagonal of this setup is just
about as long as the boards here. Note, I'm still holding the two boards
together in book-folded orientation.
Here's an alternate way to get a tight seam: a big piece of
plywood with sandpaper glued down to it. The diagonal of this setup is just
about as long as the boards here. Note, I'm still holding the two boards
together in book-folded orientation.
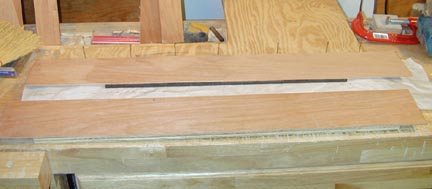 There
are numerous ways to clamp the two boards together for edge-gluing. Here's one
of the simplest. First one board is laid down on a large sheet of flat plywood,
and nails are driven into the plywood all along the edge of the board. Not
through the board -- just touching the edge of it. Then that board is lifted,
and with its edge still up against the nails, a small stick, here 1/4"
square, is placed just under the free edge so that half of it is visible. The
other board is laid on the stick and snugged up along the joint, and nails are
driven into the plywood all along the edge of this second board as well.
There
are numerous ways to clamp the two boards together for edge-gluing. Here's one
of the simplest. First one board is laid down on a large sheet of flat plywood,
and nails are driven into the plywood all along the edge of the board. Not
through the board -- just touching the edge of it. Then that board is lifted,
and with its edge still up against the nails, a small stick, here 1/4"
square, is placed just under the free edge so that half of it is visible. The
other board is laid on the stick and snugged up along the joint, and nails are
driven into the plywood all along the edge of this second board as well.
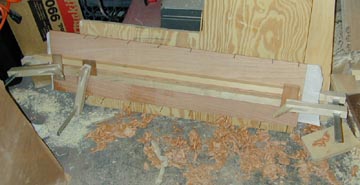
 When
the stick is removed, and the boards pushed down against the plywood base,
the nails exert just enough pressure to close the joint. Between the boards and
the plywood, I've place a sheet of "freezer paper", plastic-coated
side up, to prevent the seam from gluing itself to the plywood. You can use
waxed paper or any kind of material that the glue won't stick to. One of the
edges is coated with just enough glue to cover the whole edge with a thin film,
and the boards are pressed down. Then two sticks are clamped down along next to
the seam to keep the boards flat.
When
the stick is removed, and the boards pushed down against the plywood base,
the nails exert just enough pressure to close the joint. Between the boards and
the plywood, I've place a sheet of "freezer paper", plastic-coated
side up, to prevent the seam from gluing itself to the plywood. You can use
waxed paper or any kind of material that the glue won't stick to. One of the
edges is coated with just enough glue to cover the whole edge with a thin film,
and the boards are pressed down. Then two sticks are clamped down along next to
the seam to keep the boards flat.
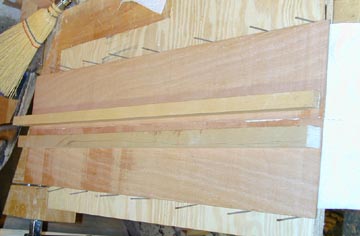
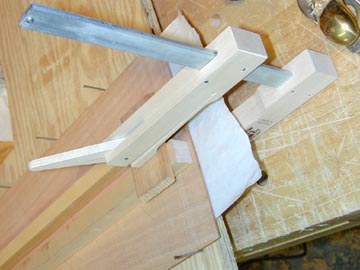 The
biggest problem with this process is keeping the boards flat against the base.
I've got two maple sticks that are slightly "sprung", i.e., their
bottom edge is curved to be thicker at the center. One of these goes on each
board right near the seam (but out of the glue squeeze-out!). When they are
clamped down at the ends, the spring in them assures that pressure is exerted
all along their length. Here another piece of scrap is used to distribute the
pressure of one clamp to both sticks.
The
biggest problem with this process is keeping the boards flat against the base.
I've got two maple sticks that are slightly "sprung", i.e., their
bottom edge is curved to be thicker at the center. One of these goes on each
board right near the seam (but out of the glue squeeze-out!). When they are
clamped down at the ends, the spring in them assures that pressure is exerted
all along their length. Here another piece of scrap is used to distribute the
pressure of one clamp to both sticks.
 Once
the sticks are clamped down, the whole assembly can be set aside for half an
hour to dry. After half an hour, pull the nails from one side, release the clamps and take the glued-up board
out to dry further; the plastic-coated paper keeps the glue from dying out on
the inner side. Let it cure for a few hours before doing any heavy planing on
it. If you don't remove the nails first, relieving the inward pressure, the
board can buckle up and crack when the clamps holding it down are taken
off.
Once
the sticks are clamped down, the whole assembly can be set aside for half an
hour to dry. After half an hour, pull the nails from one side, release the clamps and take the glued-up board
out to dry further; the plastic-coated paper keeps the glue from dying out on
the inner side. Let it cure for a few hours before doing any heavy planing on
it. If you don't remove the nails first, relieving the inward pressure, the
board can buckle up and crack when the clamps holding it down are taken
off.
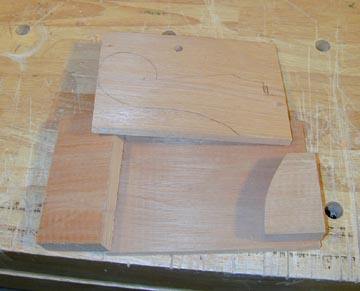 While
the front and back plates are drying, you can make the scrollhead and the
tailpiece. The scrollhead is where the tuners go, and it's glued up out of three
blocks. You can see the outline on the top slab here. Some makers carve this
part out of a single block. The scrollhead has functional and decorative
purposes. It can take many forms. Click here
for Jerry Rockwell's site: he makes some of his dulcimers with guitar-like heads
(On Jerry's home page, click the button on the left labeled "Mountain
Dulcimers"). Cripple Creek Dulcimers
makes custom dulcimers with scrollheads carved into decorative shapes (Click
"custom dulcimers"). This one will have a simple scroll.
While
the front and back plates are drying, you can make the scrollhead and the
tailpiece. The scrollhead is where the tuners go, and it's glued up out of three
blocks. You can see the outline on the top slab here. Some makers carve this
part out of a single block. The scrollhead has functional and decorative
purposes. It can take many forms. Click here
for Jerry Rockwell's site: he makes some of his dulcimers with guitar-like heads
(On Jerry's home page, click the button on the left labeled "Mountain
Dulcimers"). Cripple Creek Dulcimers
makes custom dulcimers with scrollheads carved into decorative shapes (Click
"custom dulcimers"). This one will have a simple scroll.
On this scrollhead, the part on the right attaches to the main body of the
dulcimer, and the part on the left is a moderately decorative scroll. I think of
this as the handle! The tuners are mounted in the middle section and the strings
are attached inside, between the "cheeks" of the scrollhead.
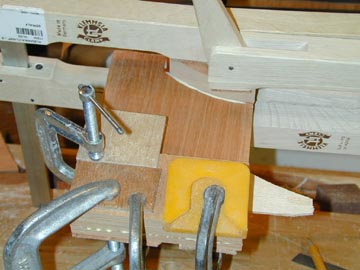 Did
I say you need a lot of clamps to be an instrument-maker? It's important to
clamp this glue-up thoroughly, because the scrollhead is a visual focus of the
instrument, and you don't want any gaps to be showing. Because three-layer
glue-ups always slide around on me, I like to do this in two steps, first the
two inner blocks to one of the sides, and then the other side glued to the
resulting assembly. There is plenty of space for guide pins, and I could do
that, but it just seems easier to do it this way. Well, a lot of glue has
to dry, so it's on to the next day.
Did
I say you need a lot of clamps to be an instrument-maker? It's important to
clamp this glue-up thoroughly, because the scrollhead is a visual focus of the
instrument, and you don't want any gaps to be showing. Because three-layer
glue-ups always slide around on me, I like to do this in two steps, first the
two inner blocks to one of the sides, and then the other side glued to the
resulting assembly. There is plenty of space for guide pins, and I could do
that, but it just seems easier to do it this way. Well, a lot of glue has
to dry, so it's on to the next day.
Previous Home
Next
Resources Glossary
of Woodworking and Lutherie Terms
Copyright © 2003 Stephen Miklos