Home
Road Map Resources
Lutherie Tools
Week 10: May 21 - 28
This week I didn't do much, even though I had a long weekend, because I was
recovering from a bad chest cold that also wrecked last weekend. Though it
wasn't a lot in terms of time, it was still pretty exciting. I got the neck
attached for the first time; the guitar's basic parts are essentially there.
 The
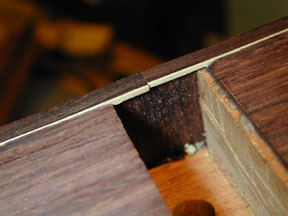
first job today is to set up the neck attachment. Two holes for the bolts are
located by measuring from the top of the soundboard and from the top surface of
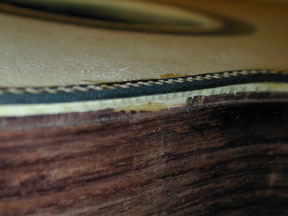
the neck, so those two surfaces line up. Where the binding crosses the neck
mortise, it makes a little rim that the neck tenon is going to have to
accommodate. You can see a little mismatch on the height of the two pieces of
binding; this will be covered by the heel of the neck when it is attached. I
scratch my head over how this mismatch occurred, since the binding rests on the
routed ledge, which should be the same depth on both sides.
The
first job today is to set up the neck attachment. Two holes for the bolts are
located by measuring from the top of the soundboard and from the top surface of
the neck, so those two surfaces line up. Where the binding crosses the neck
mortise, it makes a little rim that the neck tenon is going to have to
accommodate. You can see a little mismatch on the height of the two pieces of
binding; this will be covered by the heel of the neck when it is attached. I
scratch my head over how this mismatch occurred, since the binding rests on the
routed ledge, which should be the same depth on both sides.
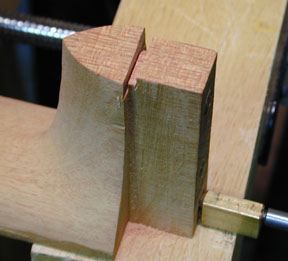 A
notch is cut into the neck tenon to step it over the binding.
A
notch is cut into the neck tenon to step it over the binding.
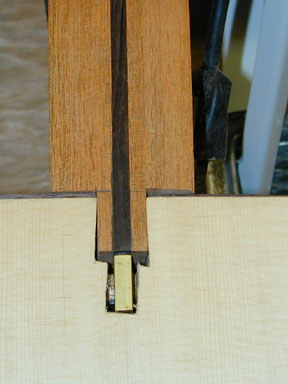 One
thing I discovered when trying to set the neck level to the top of the
soundboard is that the truss rod isn't set deeply enough into the neck. I
followed the recommendation in the LMI catalog for the routing depth, but the
top of the end piece on the truss rod is only about 1/16th" below the top
surface of the neck. and therefore hits the underside of the soundboard. Since
this part of the top is going to be buried under the fingerboard, I simply cut
it away instead of trying to make a notch in the underside of the
soundboard.
One
thing I discovered when trying to set the neck level to the top of the
soundboard is that the truss rod isn't set deeply enough into the neck. I
followed the recommendation in the LMI catalog for the routing depth, but the
top of the end piece on the truss rod is only about 1/16th" below the top
surface of the neck. and therefore hits the underside of the soundboard. Since
this part of the top is going to be buried under the fingerboard, I simply cut
it away instead of trying to make a notch in the underside of the
soundboard.
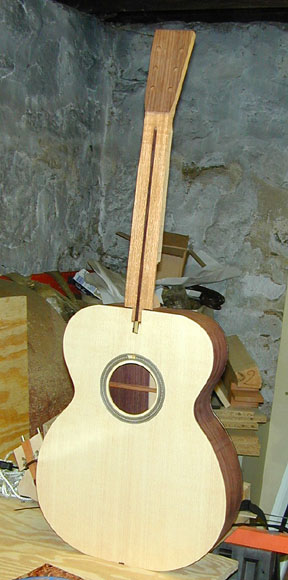 Finally,
a sense of proportion. The neck here is bolted on and feels quite firm. Of
course it looks chunky as the carving hasn't been done except at the heel.
Finally,
a sense of proportion. The neck here is bolted on and feels quite firm. Of
course it looks chunky as the carving hasn't been done except at the heel.
 The
binding and purfling stairstep is routed onto the top in the same way as on the
back, with the Dremel setup shown here.
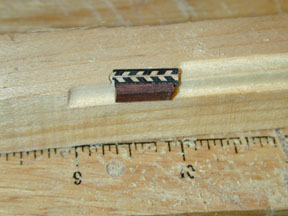
I check the depths on a piece of scrap shown here, using a short cutoff of the
herringbone purfling glued to a similar piece of the binding.
The
binding and purfling stairstep is routed onto the top in the same way as on the
back, with the Dremel setup shown here.
I check the depths on a piece of scrap shown here, using a short cutoff of the
herringbone purfling glued to a similar piece of the binding.
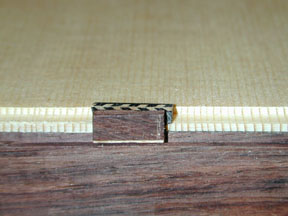 Here's
the ledge on the guitar box itself. The purfling ledge looks wide as the ocean
while I'm routing it, but it fits just right.
Here's
the ledge on the guitar box itself. The purfling ledge looks wide as the ocean
while I'm routing it, but it fits just right.
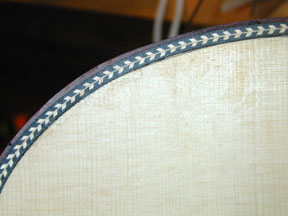
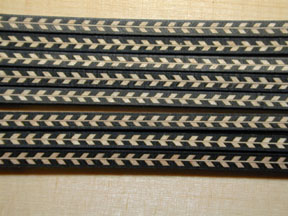 Herringbone
purfling varies in how it matches up, changing "phase" along the same
strip. In the section at the top, the white trapezoids pretty much match up even
with each other, while in the next two, they are pretty much out of phase. In
the bottom strip you can see the phase shift from one side of the picture to the
other. I bring this up because I was trying to match the two pieces that meet at
the bottom of the guitar, which I only partially succeeded in doing. [I'll add a
photo of this part later on]
Herringbone
purfling varies in how it matches up, changing "phase" along the same
strip. In the section at the top, the white trapezoids pretty much match up even
with each other, while in the next two, they are pretty much out of phase. In
the bottom strip you can see the phase shift from one side of the picture to the
other. I bring this up because I was trying to match the two pieces that meet at
the bottom of the guitar, which I only partially succeeded in doing. [I'll add a
photo of this part later on]
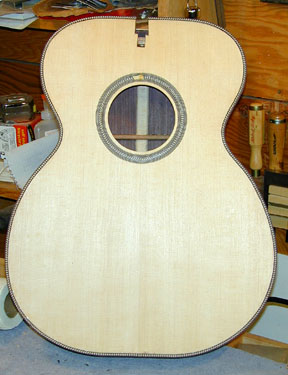 Here
is the purfled top. As with the back, I decided to glue purfling first, then
binding. Bending the herringbone was easier than bending the binding. It seems the glue
that holds it all together lets go a little with the heat and it takes and
retains a bend quite well. It is also a bit more flexible overall than the
binding, so bending it "pretty close" and squeezing it down to meet
the edge worked well.
Here
is the purfled top. As with the back, I decided to glue purfling first, then
binding. Bending the herringbone was easier than bending the binding. It seems the glue
that holds it all together lets go a little with the heat and it takes and
retains a bend quite well. It is also a bit more flexible overall than the
binding, so bending it "pretty close" and squeezing it down to meet
the edge worked well.
 Can
you see the slight gap about 1/3 of the way from the right edge? That's the only
place it happened. On the back, I got several such gaps between the purfling
(the thin black-white-black veneer strips) and the binding (thicker rosewood
strip with a maple or holly veneer strip glued to one edge. Because it's all
very dark, I hope to fill these gaps with dark brown lacquer burn-in stick. When
it comes to "finiting" I'll show that process.
Can
you see the slight gap about 1/3 of the way from the right edge? That's the only
place it happened. On the back, I got several such gaps between the purfling
(the thin black-white-black veneer strips) and the binding (thicker rosewood
strip with a maple or holly veneer strip glued to one edge. Because it's all
very dark, I hope to fill these gaps with dark brown lacquer burn-in stick. When
it comes to "finiting" I'll show that process.
 You
can see here where the routing went through the side material in a few places
and revealed the inner lining.
You
can see here where the routing went through the side material in a few places
and revealed the inner lining.
Previous Next
Home
Road Map Resources
Lutherie Tools
Copyright © 2001 Stephen Miklos